A strong technical setup is the foundation of a great live session. Here's what you need to know before your first broadcast.
Equipment
Required:
- Google Chrome - the recommended browser.
Recommended:
- External USB or XLR microphone - significantly improves audio quality over a built-in laptop mic. Popular options for seated practices include the Shure MV7 and Blue Yeti; popular options for movement practices include Rode and DJI wireless mics.
- External webcam or dedicated camera - provides better image quality than most built-in laptop cameras. A dedicated camera connected via USB also works well. Your camera’s resolution should be at least 1920×1080. You can test your computer or laptop’s camera here: https://webcamtests.com/
- Headphones (optional) - help you monitor your audio and avoid feedback loops.
- Audio amplifier or mixer (optional) - useful if you're playing music or connecting other audio sources.
Internet Connection
A stable internet connection is essential. A poor connection is one of the most common causes of a disrupted live session.
Minimum requirements:
- 10 Mbps download / 7 Mbps upload
Recommended:
- 50 Mbps download / 20 Mbps upload or higher for consistent stability
Best practices:
- Use a wired Ethernet connection whenever possible - it's far more stable than Wi-Fi.
- Test your speed before going live at speedtest.net.
- Close bandwidth-heavy apps: Dropbox, Google Drive, OneDrive, and cloud sync tools.
- Ask others on your network to pause video streaming, large downloads, or video calls during your session.
- Disable automatic app updates on your computer on the day of your event.
If your connection drops mid-session: Rejoin from your Teacher Dashboard as quickly as possible. Note that if you close your Live Event browser tab, the session ends on your end and cannot be rejoined - keep that tab open and avoid multitasking across multiple browser windows.
Lighting
Good lighting is one of the biggest factors in how professional your stream looks.
Best Practices:
- Place your primary light source in front of you, at face level or slightly above. This is called front lighting, and it eliminates unflattering shadows.
- Use natural daylight when possible - position yourself facing a window, not with a window behind you.
- If streaming in the evening or in a darker space, use a ring light or LED panel positioned in front of you.
- Aim for even, consistent lighting across your face - no harsh shadows on one side.
Avoid:
- Bright light sources behind you (windows, lamps, screens) - this creates silhouetting and makes you appear dark on camera.
- Overhead lighting only - it creates unflattering shadows under your eyes and chin.
- Mixing warm and cool light sources, which creates uneven, distracting colour tones.
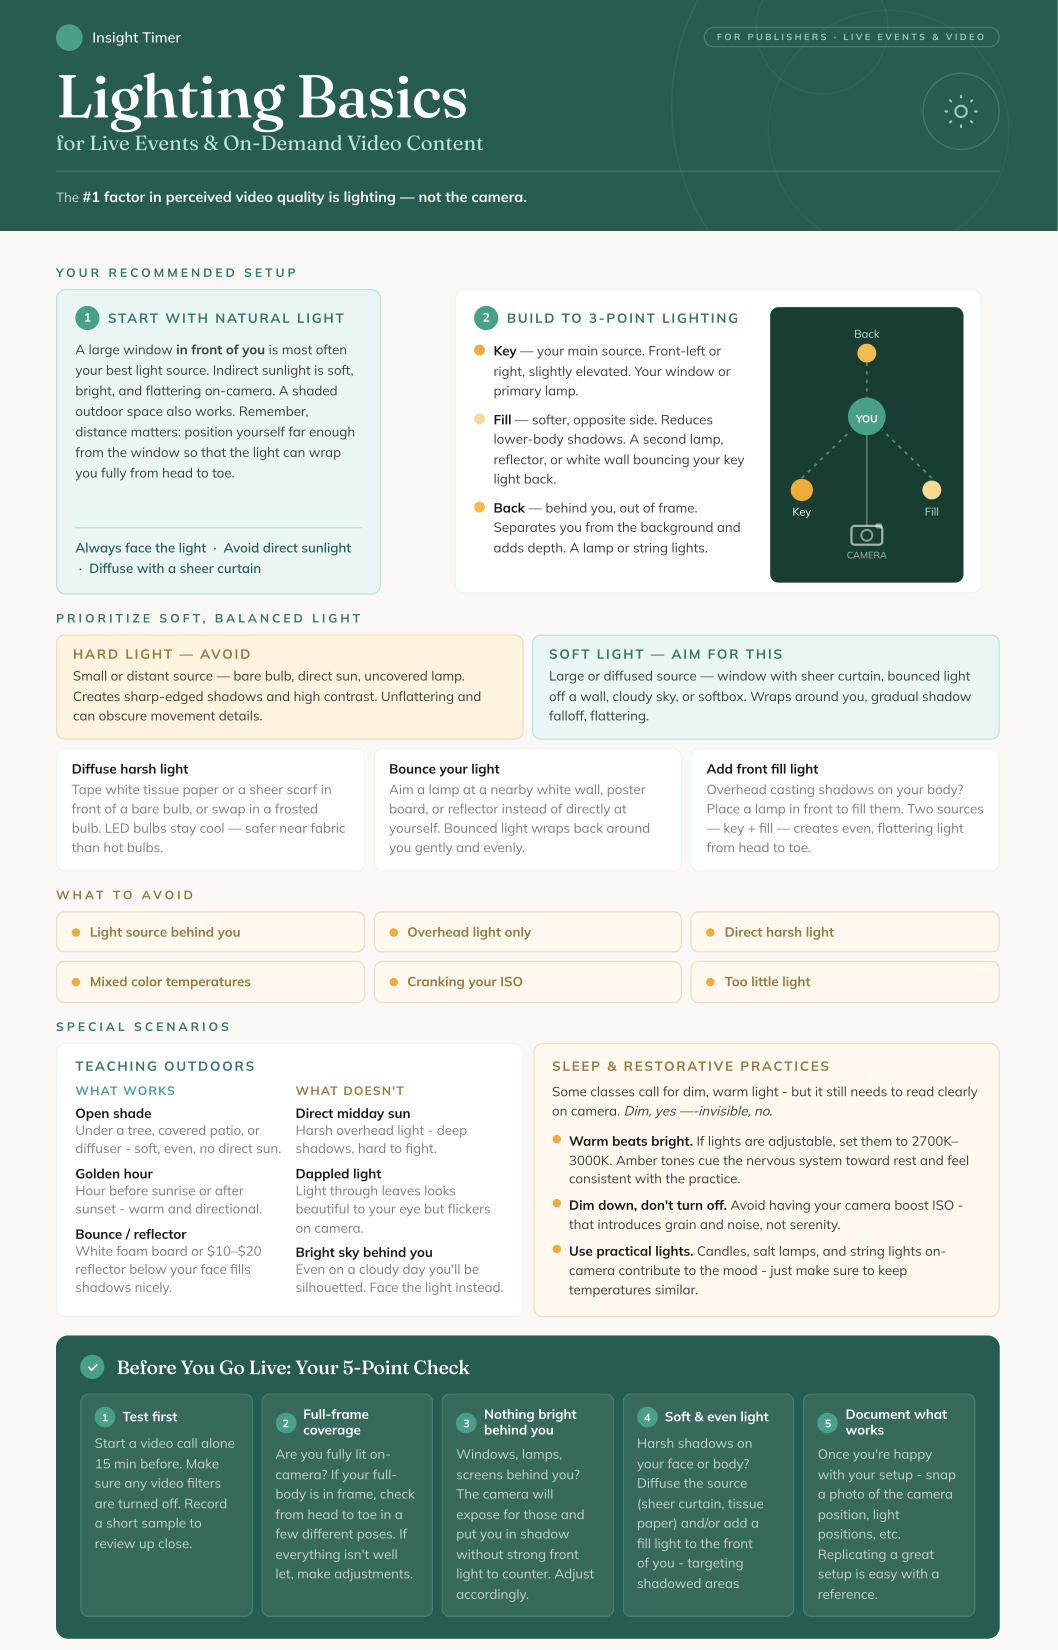
You can refer to our Lighting Basics for Live Events and On-Demand Video Content visual guide for more tips.
Camera Framing
How you position yourself on camera communicates professionalism and helps your students feel connected to you.
Best Practices:
- Position your camera at eye level. Looking up or down at your camera can be disorienting for viewers.
- For seated practices: Frame the camera so your eyes are roughly in the upper third of the frame, with a small amount of space above your head.
- For movement-based classes (yoga, breathwork, etc.): Position the camera at chest height (be mindful of whether you'll mostly be sitting or standing). Ensure your full body is visible.
- Use a tripod or stable mount to avoid shaky footage or unlevel framing. Typing on a laptop that you stream from can make the camera shake if not properly stabalized.
Avoid:
- Looking down at your camera - this is especially common with laptops on desks.
- Placing yourself too close to the camera (cutting off your head) or too far away.
- Handheld shots for movement classes - the camera should remain stable.
Audio
Clear audio is an incredibly important technical element of a live session. Students can forgive imperfect video, but poor audio breaks immersion immediately.
Best Practices:
- Use an external USB or XLR microphone. Built-in laptop microphones can often pick up keyboard noise, fan noise, and room echo.
- Keep your microphone 15–20 cm (6–8 inches) from your mouth for seated practices. Attach a wireless microphone close to your mouth for movement practices.
- Go live from a quiet room with soft furnishings (rugs, curtains, cushions) that absorb sound and reduce echo.
- Mute all notifications on your computer before going live.
- Test your audio using the Playback my microphone toggle in the broadcast interface before starting.
Avoid:
- Built-in laptop microphones, especially in large, bare rooms with hard walls.
- Echo-prone spaces - empty rooms, tiled bathrooms, and rooms with lots of glass surfaces.
- Positioning your microphone too far away, or in a way that picks up keyboard noise.
Audio setting: Stereo vs. High Quality (Mono): In Stream Settings, you'll see two audio options:
- Stereo: Two separate audio channels that create a sense of depth and directionality. Great if you're playing music or want a more immersive, spatial sound experience.
- High Quality (Mono): A single audio channel that plays the same signal through all speakers. Clean and focused - works well for voice-forward sessions like guided meditation and talks.

Playing Background Music
Background music can enhance the atmosphere of your session. There are two main approaches:
- External speaker: The simplest option, though often lower quality - play music from a separate device in the room. No software setup required. Note: When playing background music from a separate device, make sure noise reduction is NOT toggled on.
- Computer audio via OBS: If you want to route music directly from your computer into the stream, you'll need to use a platform like OBS. See the OBS section below for more information.
Note: Our platform supports one audio input at a time. Routing computer audio requires OBS or a physical mixer.
Video Quality
Beyond lighting and framing, a few additional factors affect overall video quality:
- Use an external webcam with HD resolution (1080p is recommended) if possible - it noticeably improves sharpness compared to a built-in laptop camera.
- Select 1080p for video quality in the live dashboard, assuming you have a strong internet connection.
- Keep your device plugged into power during your entire session. Video streaming drains battery quickly and can affect performance.
- We recommend using only one device for broadcasting. Switching between devices mid-stream can create technical issues.
Background & Staging
Your background is a big part of your on-camera presence. A thoughtfully prepared space makes your broadcast feel more intentional and professional.
Best Practices:
- Choose a clean, uncluttered background that isn't visually distracting.
- A neutral wall, bookshelf, plants, or a simple, curated space all work well.
- Consider what your background communicates - warmth, calm, and professionalism are good aims.
Avoid:
- Messy or cluttered backgrounds with visible household items (dishes, tools, laundry, TVs, monitors, etc.).
- Busy patterns or bright colours directly behind you that compete with your presence on camera.
- Backgrounds that shift or change mid-session (like an open window with movement outside).
Using OBS (Open Broadcaster Software)
OBS is a free, open-source streaming tool that gives you more control over your broadcast setup. It's not required to go live on Insight Timer, but many teachers use it to elevate their live experience. You can learn more and download OBS at obsproject.com.
What OBS can help you do:
- Route computer audio (like background music) directly into your live stream
- Use an external camera as a more controlled video input
- Manage multiple audio sources (e.g. a microphone and a music player simultaneously)
Before using OBS
- Your computer needs at least 8GB of RAM to run OBS alongside a live stream without performance issues.
- Restart your computer after installing OBS.
- On macOS, you'll need to grant OBS permission to access your camera.
- If OBS is installed but not in active use, fully quit the application before going live — it can interfere with microphone and camera access even when running in the background.
For troubleshooting, visit the OBS help page.
Note: OBS is third-party software. Insight Timer's support team can help with general guidance, but for OBS-specific issues, we recommend their official documentation.